ADAP-KDB v1.9.0 User Manual
Du-lab Team
Department of Bioinformatics and Genomics
University of North Carolina at Charlotte
dulab.binf@gmail.com — https://www.du-lab.org/
October 24, 2025
Chapter 1. Introduction
1.1 What is ADAP-KDB ?
ADAP-KDB is a web application for compound identification, annotations, and prioritization. Users can upload spectra to ADAP-KDB to perform library matching against publicly available and user-provided private spectral libraries. ADAP-KDB serves as a compound and mass spectra search engine that enables the users to identify and prioritize spectra through comprehensive library matching capabilities.
The application is accessible through a public cloud instance at https://adap.cloud and requires a desktop browser with JavaScript enabled (Google Chrome, Firefox, Safari, or Microsoft Edge). A 1920×1080 resolution is recommended for optimal data tables and plots visualization, and a stable internet connection is essential for large file uploads and long-running searches.
1.2 ADAP Informatics Ecosystem
ADAP-KDB is a part of the ADAP informatics ecosystem.
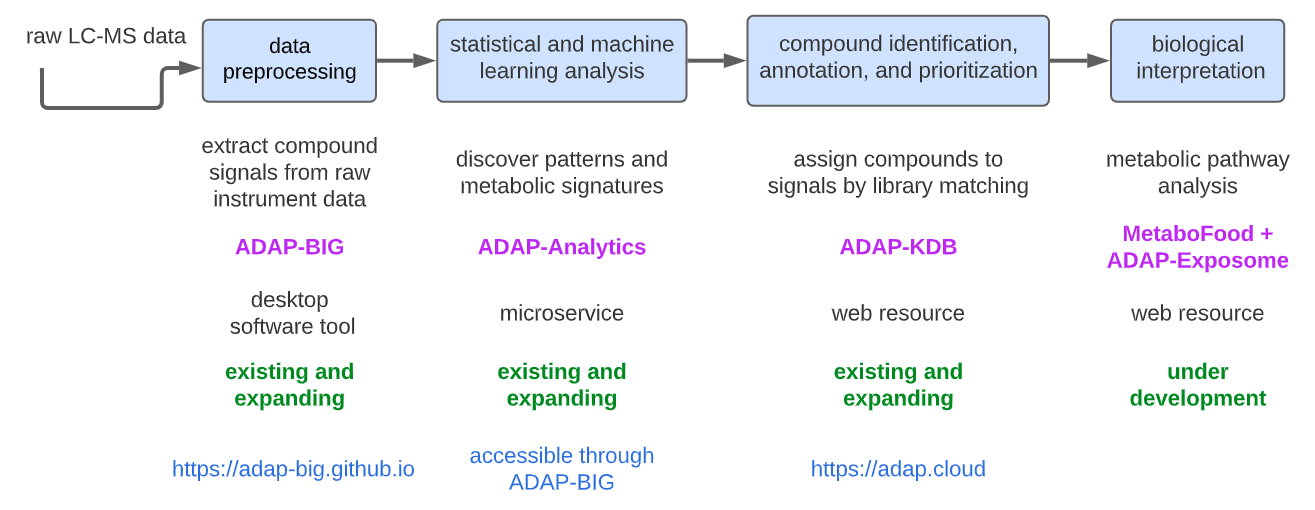 Figure 1.2: ADAP Informatics Ecosystem for processing and analyzing mass
spectrometry data.
Figure 1.2: ADAP Informatics Ecosystem for processing and analyzing mass
spectrometry data.
- ADAP-BIG performs data preprocessing on raw GC-MS and LC-MS datasets. It extracts compound signals from instrument files, detects chromatographic peaks, groups them into features, and export CSV files containing detected features (m/z, retention time, intensity, etc.) and MSP files containing MS/MS spectra for features that have fragmentation data. This stage converts complex raw MS data into structured, analysis-ready feature tables and spectral libraries.
- ADAP-Analytics (accessible through ADAP-BIG) performs statistical and machine-learning analysis (ANOVA, PCA, PLS-DA).
- ADAP-KDB ADAP-KDB is a web-based compound identification, annotation, and prioritization engine where users can upload spectral files to perform library matching against private and/or public libraries.
- MetaboFood + ADAP-Exposome (in development) focuses on biological interpretation of metabolomics data.
Together, these components supply an end-to-end solution: from raw signal processing (ADAP-BIG) to knowledgebase-driven identification and prioritisation (ADAP-KDB).
1.3 User Interface Overview
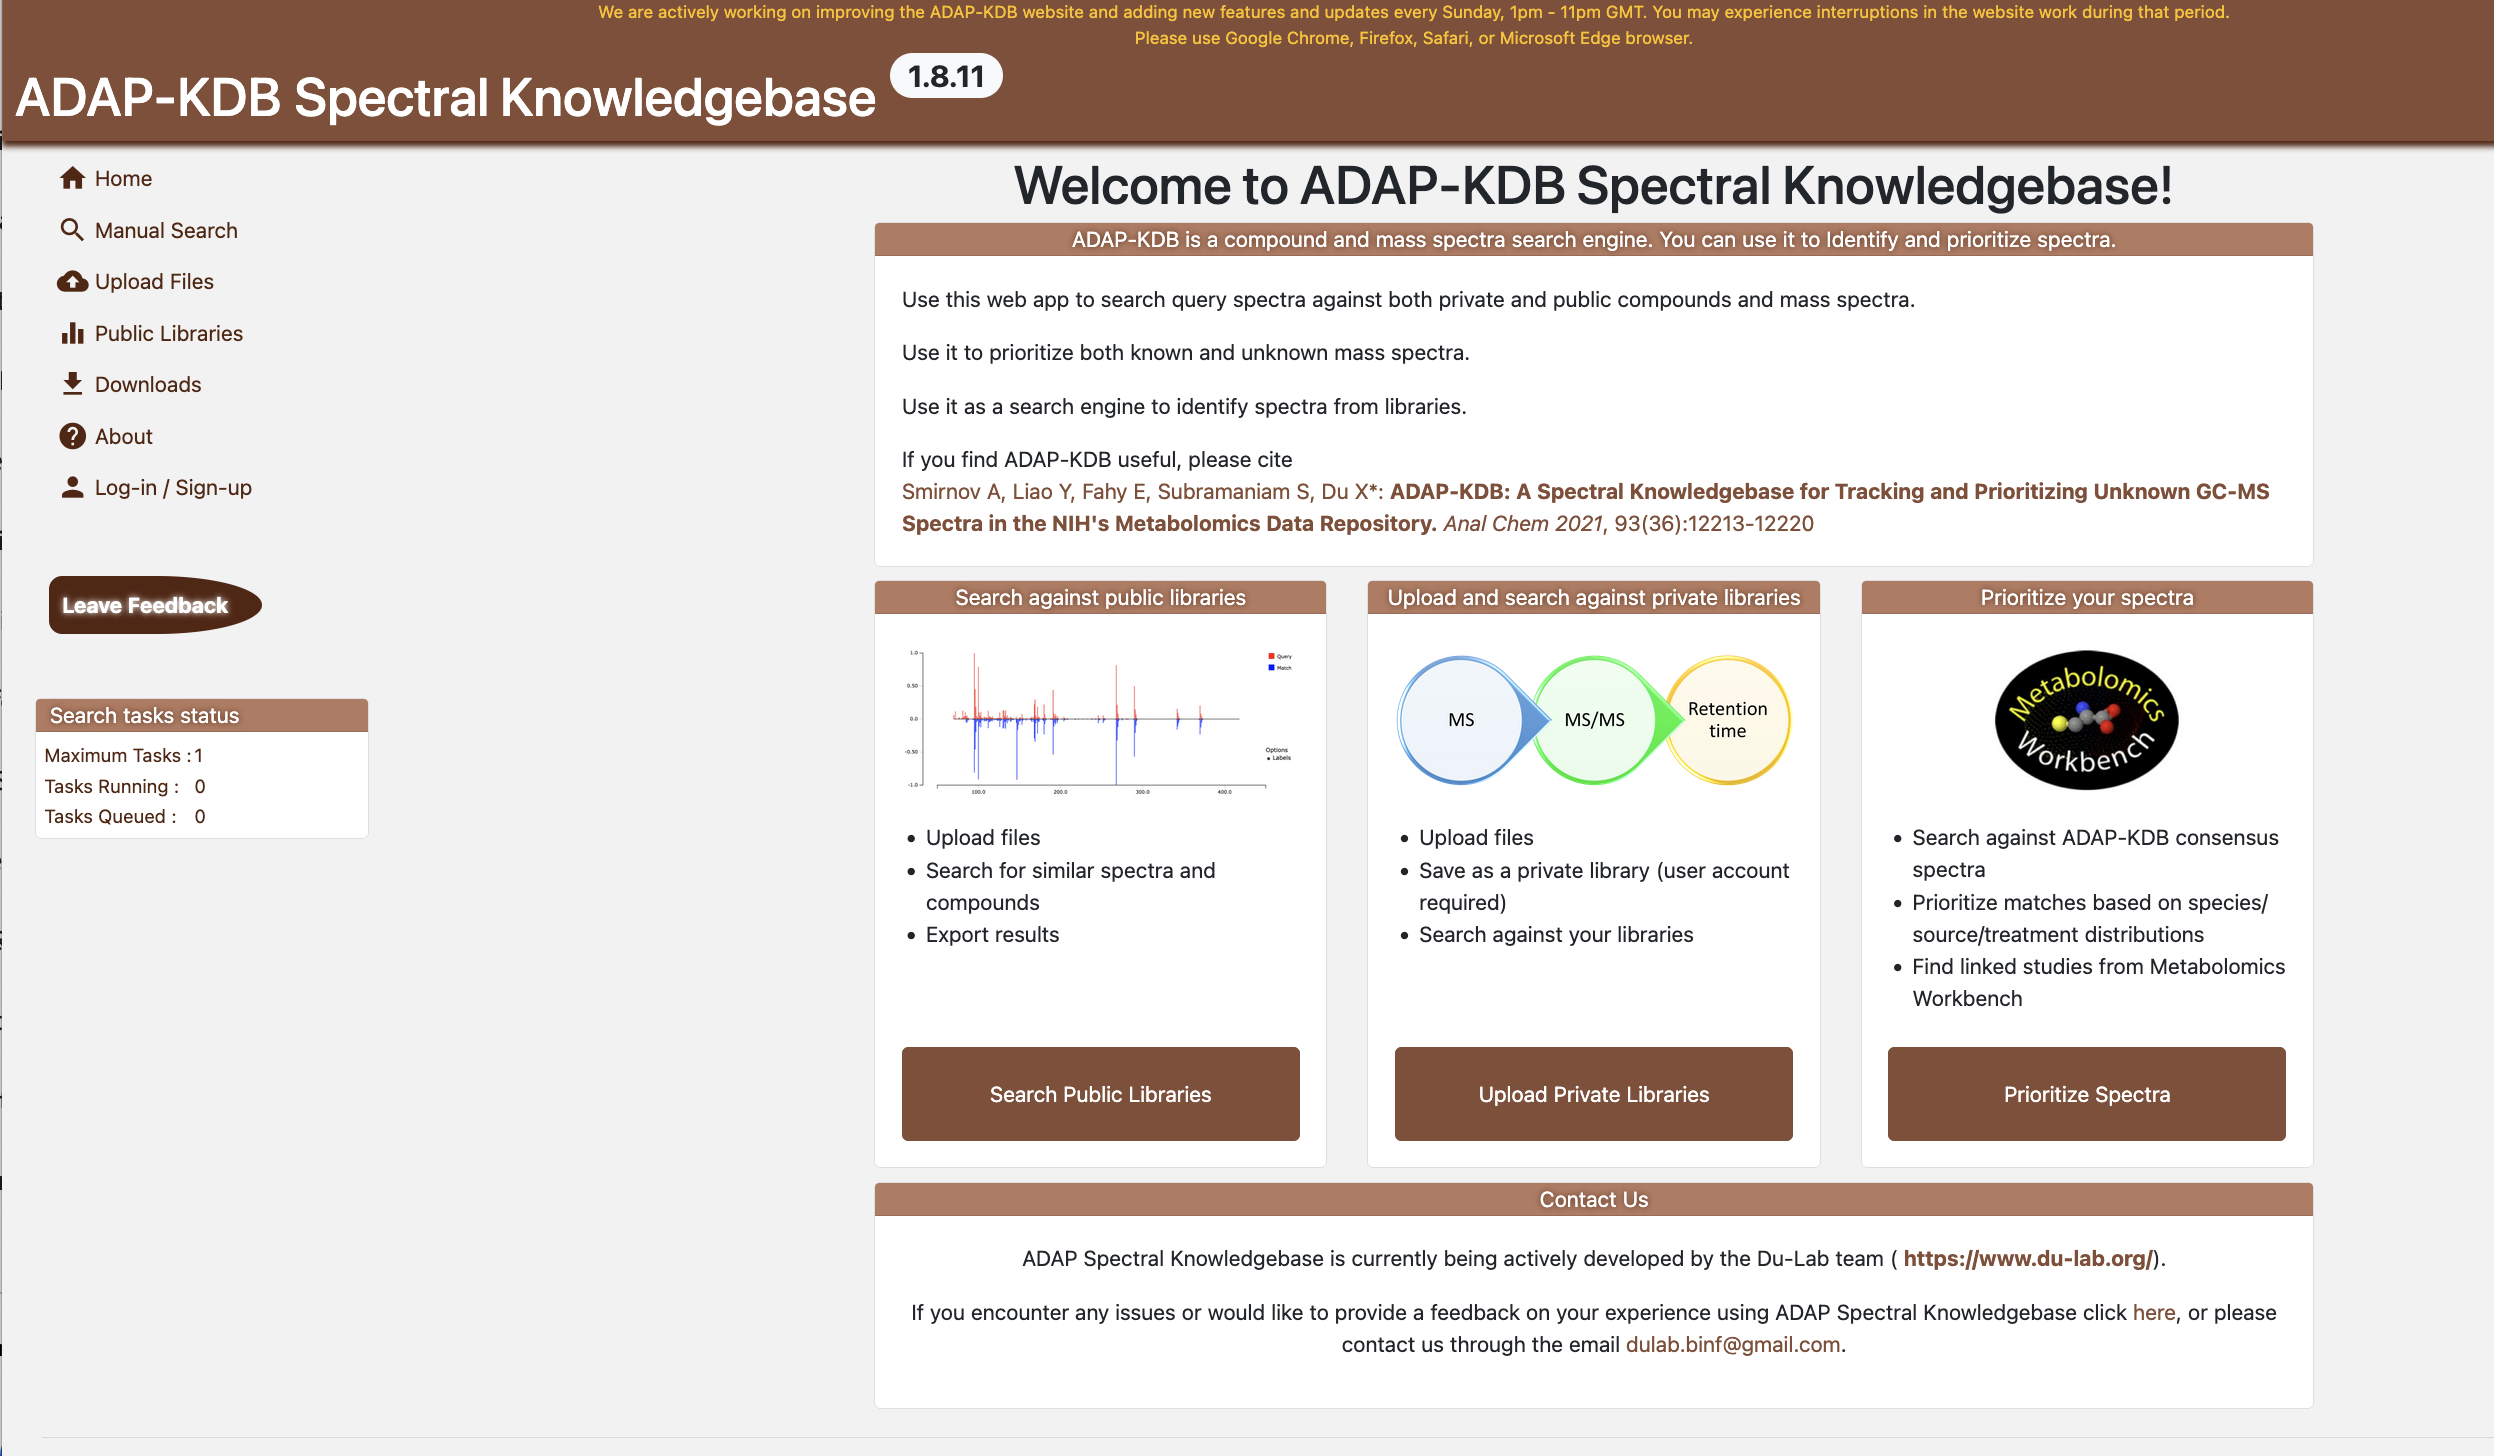 Figure 1.3:
ADAP-KDB Landing Page
Figure 1.3:
ADAP-KDB Landing Page
The landing page presents three guided entry points:
- Search public libraries - Browse and explore publicly available spectral libraries to discover known compounds and their spectral data.
- Upload and search against private libraries — Upload your own spectral data files and search them against your private libraries or public libraries for compound identification.
- Prioritise your spectra — (in development)
Primary navigation (left sidebar) links to:
- Manual Search - Quickly search for compound matches by entering spectrum data directly without uploading files. Ideal for testing single spectra or when you have spectrum data ready to paste.
- Libraries — Browse and explore available spectral libraries, including public libraries and consensus spectra compiled from multiple sources.
- Downloads — Access pre-compiled consensus library exports for offline use or integration with other tools.
- Account — Manage your user account, including registration, login, profile settings, and access to your saved submissions and search history.
1.4 Providing Feedback and Reporting Issues
- Email: adap.helpdesk@gmail.com
- Feedback form: https://forms.gle/zYPXt463DC1WjJMy8
Please include your contact information, reproduction steps, browser details, when reporting issues for the best troubleshooting experience.
Chapter 2. Creating an Account
2.1 Account Types and Permissions
| Role | Library Search Capabilities |
|---|---|
| Guest (unauthenticated) | Browse public libraries, run spectral search, consensus clusters, and downloads. Uploading files permitted but saving requires login and CAPTCHA. |
| Registered user | Create private libraries, run spectral searches, manage own studies, access private results, export matches. |
| Organization Account | All registered user capabilities plus organization-wide management: aprove, edit, and delete any studies within the organization, and manage organization members and their access. |
Private studies remain invisible to guests and other users.
2.2 Registration, Login, and Session Management
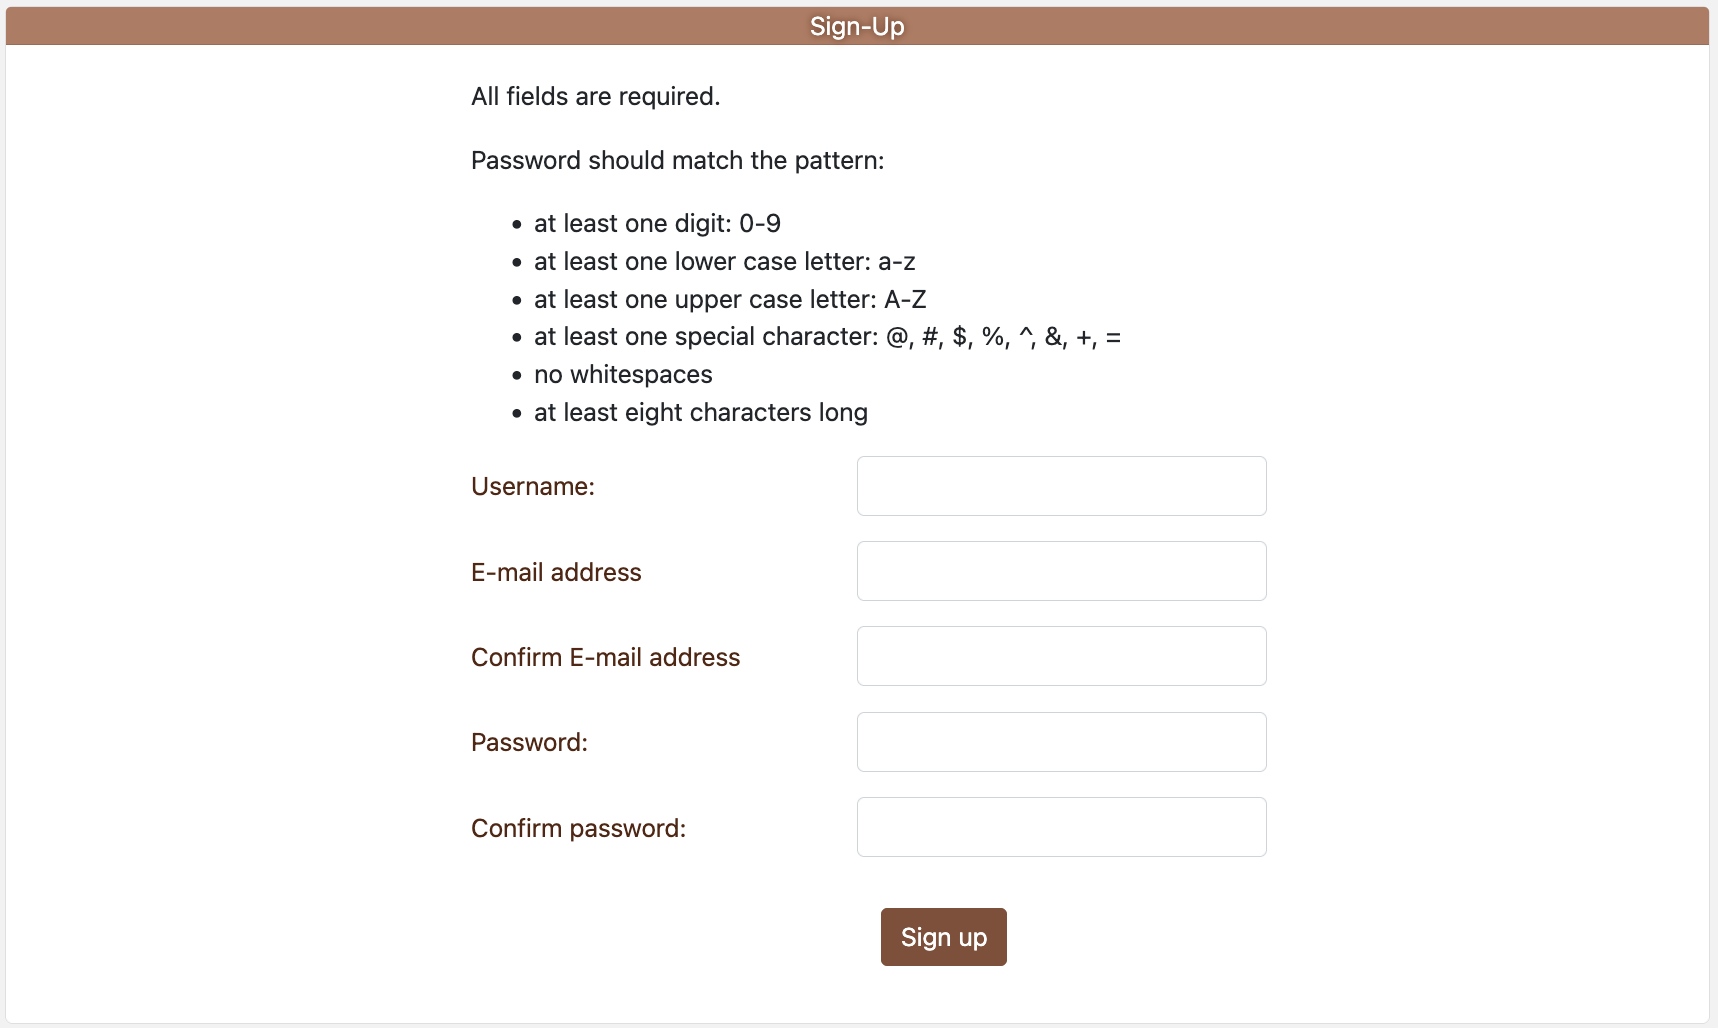 Figure 2.1:
Sign-up page
Figure 2.1:
Sign-up page
- To register for an account, click on “Register” on the
Log-in/Sign-up page.
- All fields are required.
- Password policy: ≥8 characters including uppercase, lowercase, digit, and special character; no whitespace.
- Complete the Google reCAPTCHA before submission.
- Confirm your email (if validation is configured) and log in via Log-in/Sign-up page.
- Successful login redirects to the landing page.
- Sessions remain active until logout or browser closure.
2.3 Password Recovery and Sign-Out
- Forgot username/password: Click on Forgot username ? or Forgot password ? (from the login page). Provide your username or email to receive reset instructions.
- Logout: select
Logoutfrom the top-right menu.
2.4 Account Page Overview
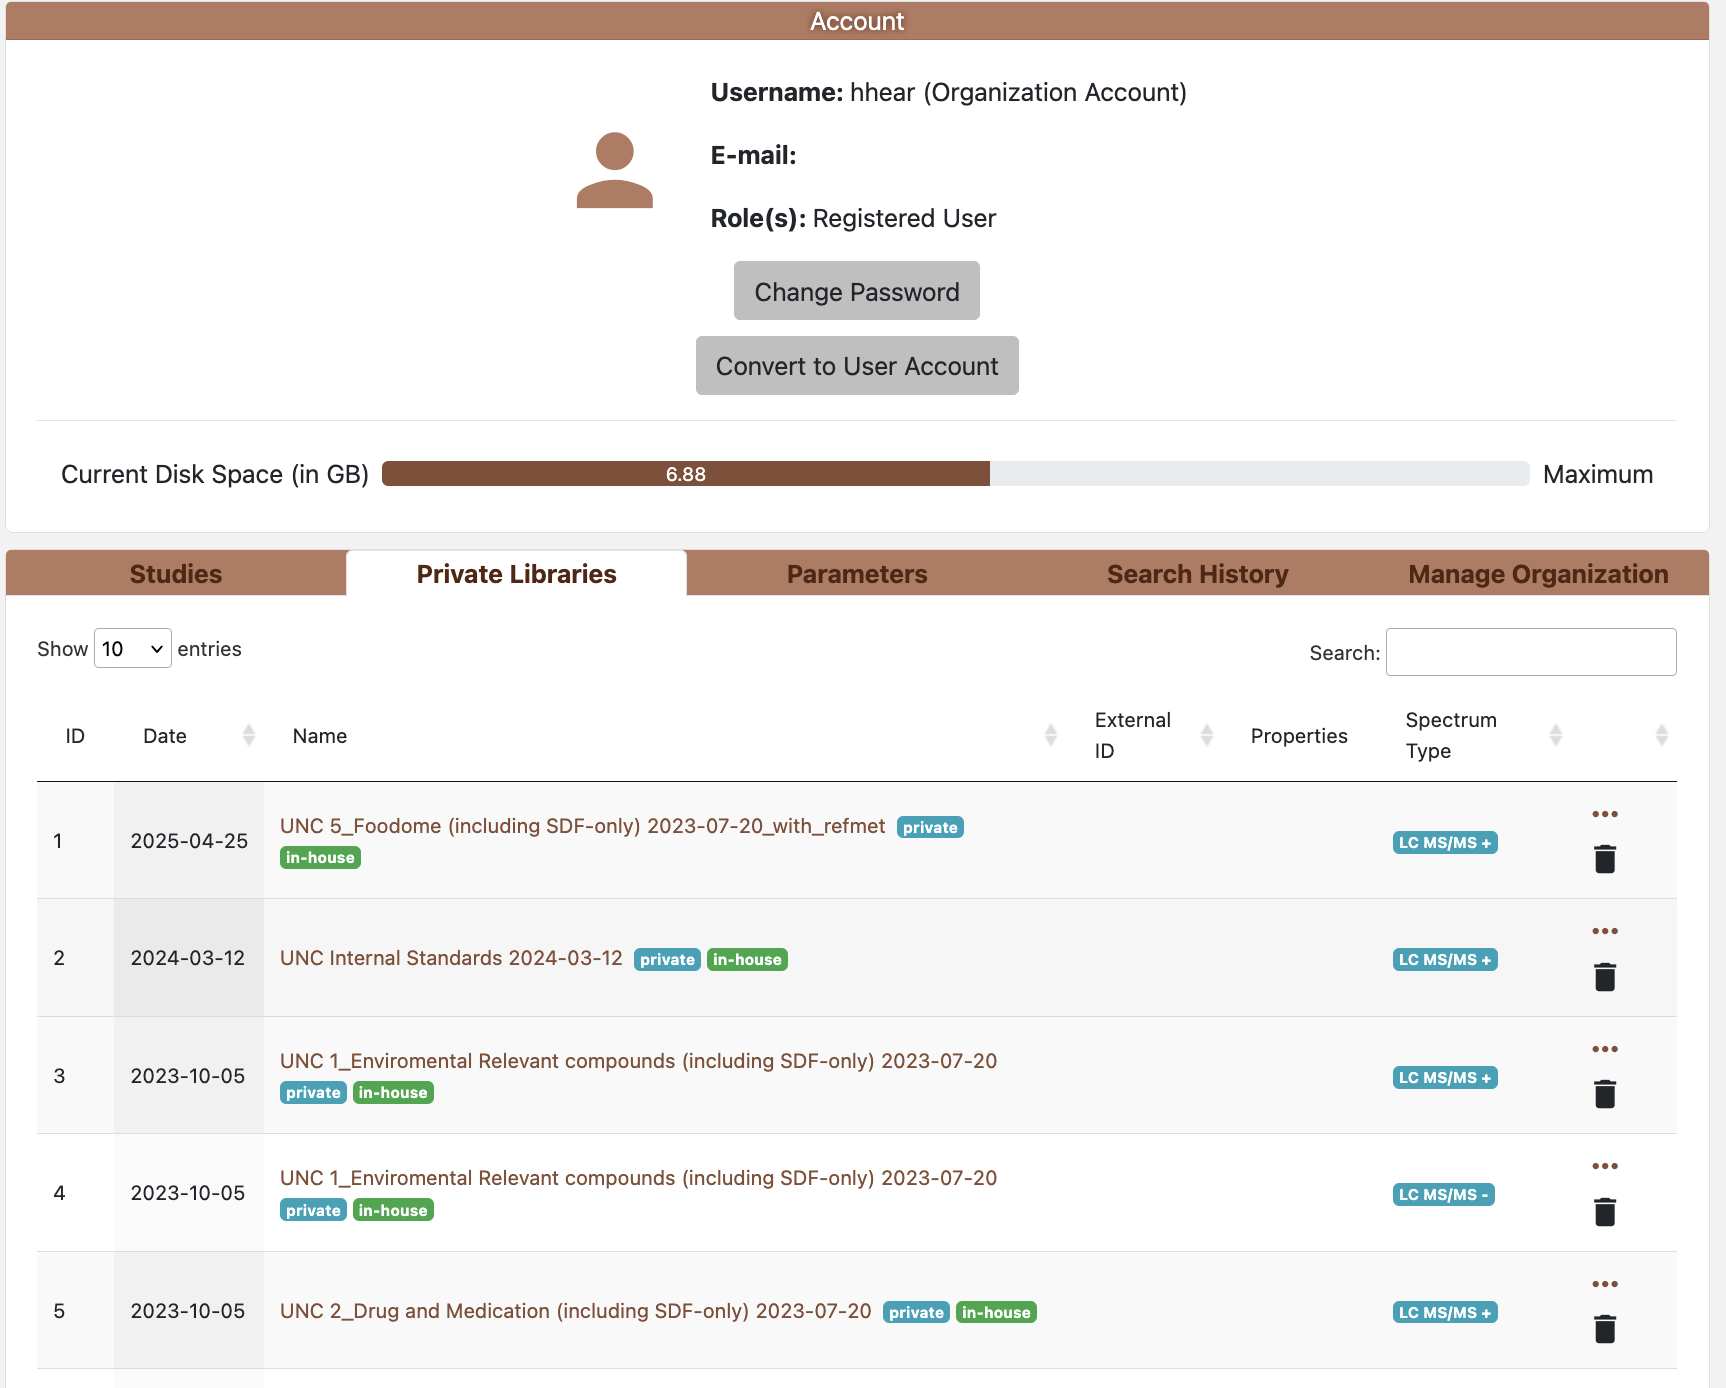 Fiture 2.2: Account page
The Account page aggregates user-scoped tools and data across several tabs. Tabs visible to you depend on role and organization membership. Organizations enable data sharing and collaboration within a lab or team, allowing members to share private studies and in-house libraries. For more information about organization accounts and their capabilities, see section 2.1.
Studies
- Lists your uploaded studies (private by default) with status, spectrum counts, chromatography type, and visibility flags.
- Actions: view/edit studies, run group search, toggle private/public (where permitted), export studies.
Private Libraries
- Shows your in-house reference libraries.
- Can view and edit library’s metadata by clicking on the library name.
- Can view spectrum information
- Visibility: private to you
Parameters
- User defaults for search forms:
- Score threshold (0–1000)
- m/z tolerance value and units (Da or ppm)
- Retention time/index tolerances and matching mode (GC-MS only)
- Matches per spectrum (limit)
- Leaving a field blank uses the system default; saved values pre-fill Individual and Group Search.
Search History
- Chronological log of your recent Group Searches with timestamps, submission/file context, software version, and parameter snapshots.
- Actions: reopen a result, re-run with updated parameters, or export recent reports.
Manage Organization (for organization account)
- Search for users by username and invite them to join the organization by sending an email invitation. Revoke access for current organization members as needed.
Chapter 3. Spectral Search
3.1 When to Use Spectral Search
Spectral Search runs library matching for every spectrum in an uploaded file or previously saved study, then aggregates results. Use it when you need to:
- Identify spectra by matching against private libraries
- Annotate spectra by matching against public libraries
- Produce match tables for downstream statistics or reporting.
- Re-run an analysis with updated parameters/libraries without manual per‑spectrum work.
Choose Individual Search (Chapter 5) when evaluating a single spectrum interactively.
3.2 Launching a Spectral/Group Search Job
There are two typical starting points for a spectra search:
- From a new upload (session‑based, not yet saved)
- From an existing submission (saved in your account)
Step-by-step (recommended workflow):
- Upload files (see more details in chapter 6.4)
- Click Upload File and select the correct chromatography type (GC‑MS, LC‑MS, or LC‑MS/MS). This determines matching logic and available parameters.
- Add MSP/MGF (spectra) and optionally CSV metadata. You can mix file types.
- Map metadata (optional but recommended)
- On the Add Metadata page, map detected fields (e.g., Name, Formula, Precursor m/z, Retention Time, Identifiers); See Chapter 6.3 for details on metadata mapping.
- If the same field exists in MSP and CSV, mapped values are merged.
- Review/save the submission
- After adding metadata, a submission overview page is shown. On this page, you can save submission, view spectral data, or download the files. See more details in chapter 6.4.
- Spectral/Group search can be run wihtout saving; the submission stays in your session until cleared or expired.
- Saving creates a persistent submission visible under Account -> Studies.
- Open Spectral/Group Search parameters
Click on the Search button on the top right.
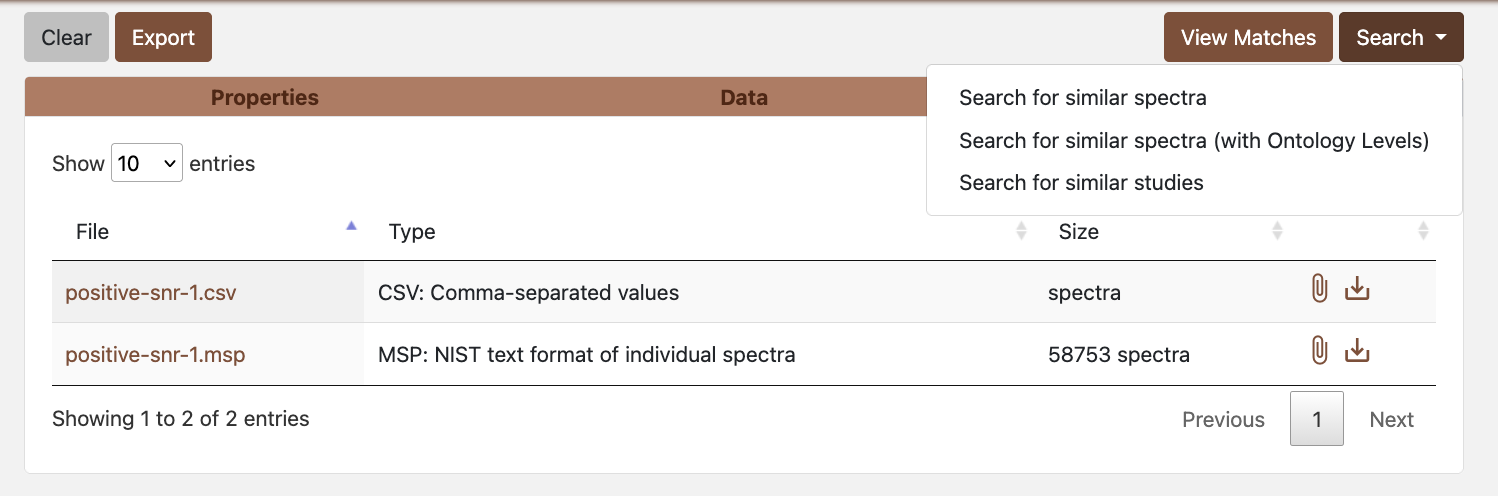 Figure 3.1: Group search options
Choose whether to search with or without ontology level (optional).
- Without ontology levels: Uses your custom search parameters (score threshold, m/z tolerance, etc.) and returns all matches that meet those criteria. This gives you full control over filtering criteria.
- With ontology levels: Uses standardized, stricter search parameters and automatically classifies matches into confidence levels (NV, Level 1, Level 2, Level 3) based on multiple criteria including fragmentation score, mass error, retention time error, and isotopic similarity. This provides a standardized confidence classification system that helps prioritize high-quality identifications. Note that matches that don’t meet the thresholds for any ontology level will not be assigned a level.
Pick target libraries (public, your private, and/or organization‑shared libraries). The libraries shown are filtered based on the chromatography type (positive or negative mode) of the uploaded files.
Set parameters (only available when searching without ontology levels): score threshold, m/z tolerance (Da or ppm), retention options, matches per spectrum. When searching with ontology levels, these parameters are automatically set to standardized values and cannot be customized.
Enable Send Result to Email to receive export files via email (registered users only).
- Launch and monitor
- Start the job; the progress bar updates as spectra are processed. You can stop the job or start a new one with different parameters.
- Closing the browser does not stop the job; revisit the search result page by clicking on the Group Search Results button.
3.3 Parameter Fields and Library Selection
Key fields in the Spectral/Group Search parameters (Only available when searching without ontology levels.):
- Score threshold (0–1000): Minimum similarity score for matches to be included in results.
- m/z tolerance with selectable units (Da/ppm): Mass accuracy tolerance for matching peaks.
- Retention time tolerance (minutes) and retention index tolerance (units defined by dataset): Optional retention-based filtering.
- Ontology level aggregation: Choose whether to
search with or without ontology level aggregation.
- Without ontology levels: Uses your custom search parameters and returns all matches meeting those criteria.
- With ontology levels: Uses standardized, stricter parameters and automatically classifies matches into confidence levels (NV, Level 1, Level 2, Level 3) based on fragmentation score, mass error, retention time error, and isotopic similarity. Matches that don’t meet thresholds for any level will not be assigned an ontology level.
- Library selector: multi-select list of public and private studies available to the user. At least one library is required.
- Email delivery: Enable this option to automatically send CSV export files to your account email address when the search completes (registered users only).
3.4 Monitoring Progress and Managing Jobs
After submission, the application:
- Updates a progress bar
- Provides a Stop Search button to cancel long runs.
Closed browsers do not cancel the job; click on the Group Search Results button to monitor the search.
3.5 Reviewing Spectral/Group Search Results
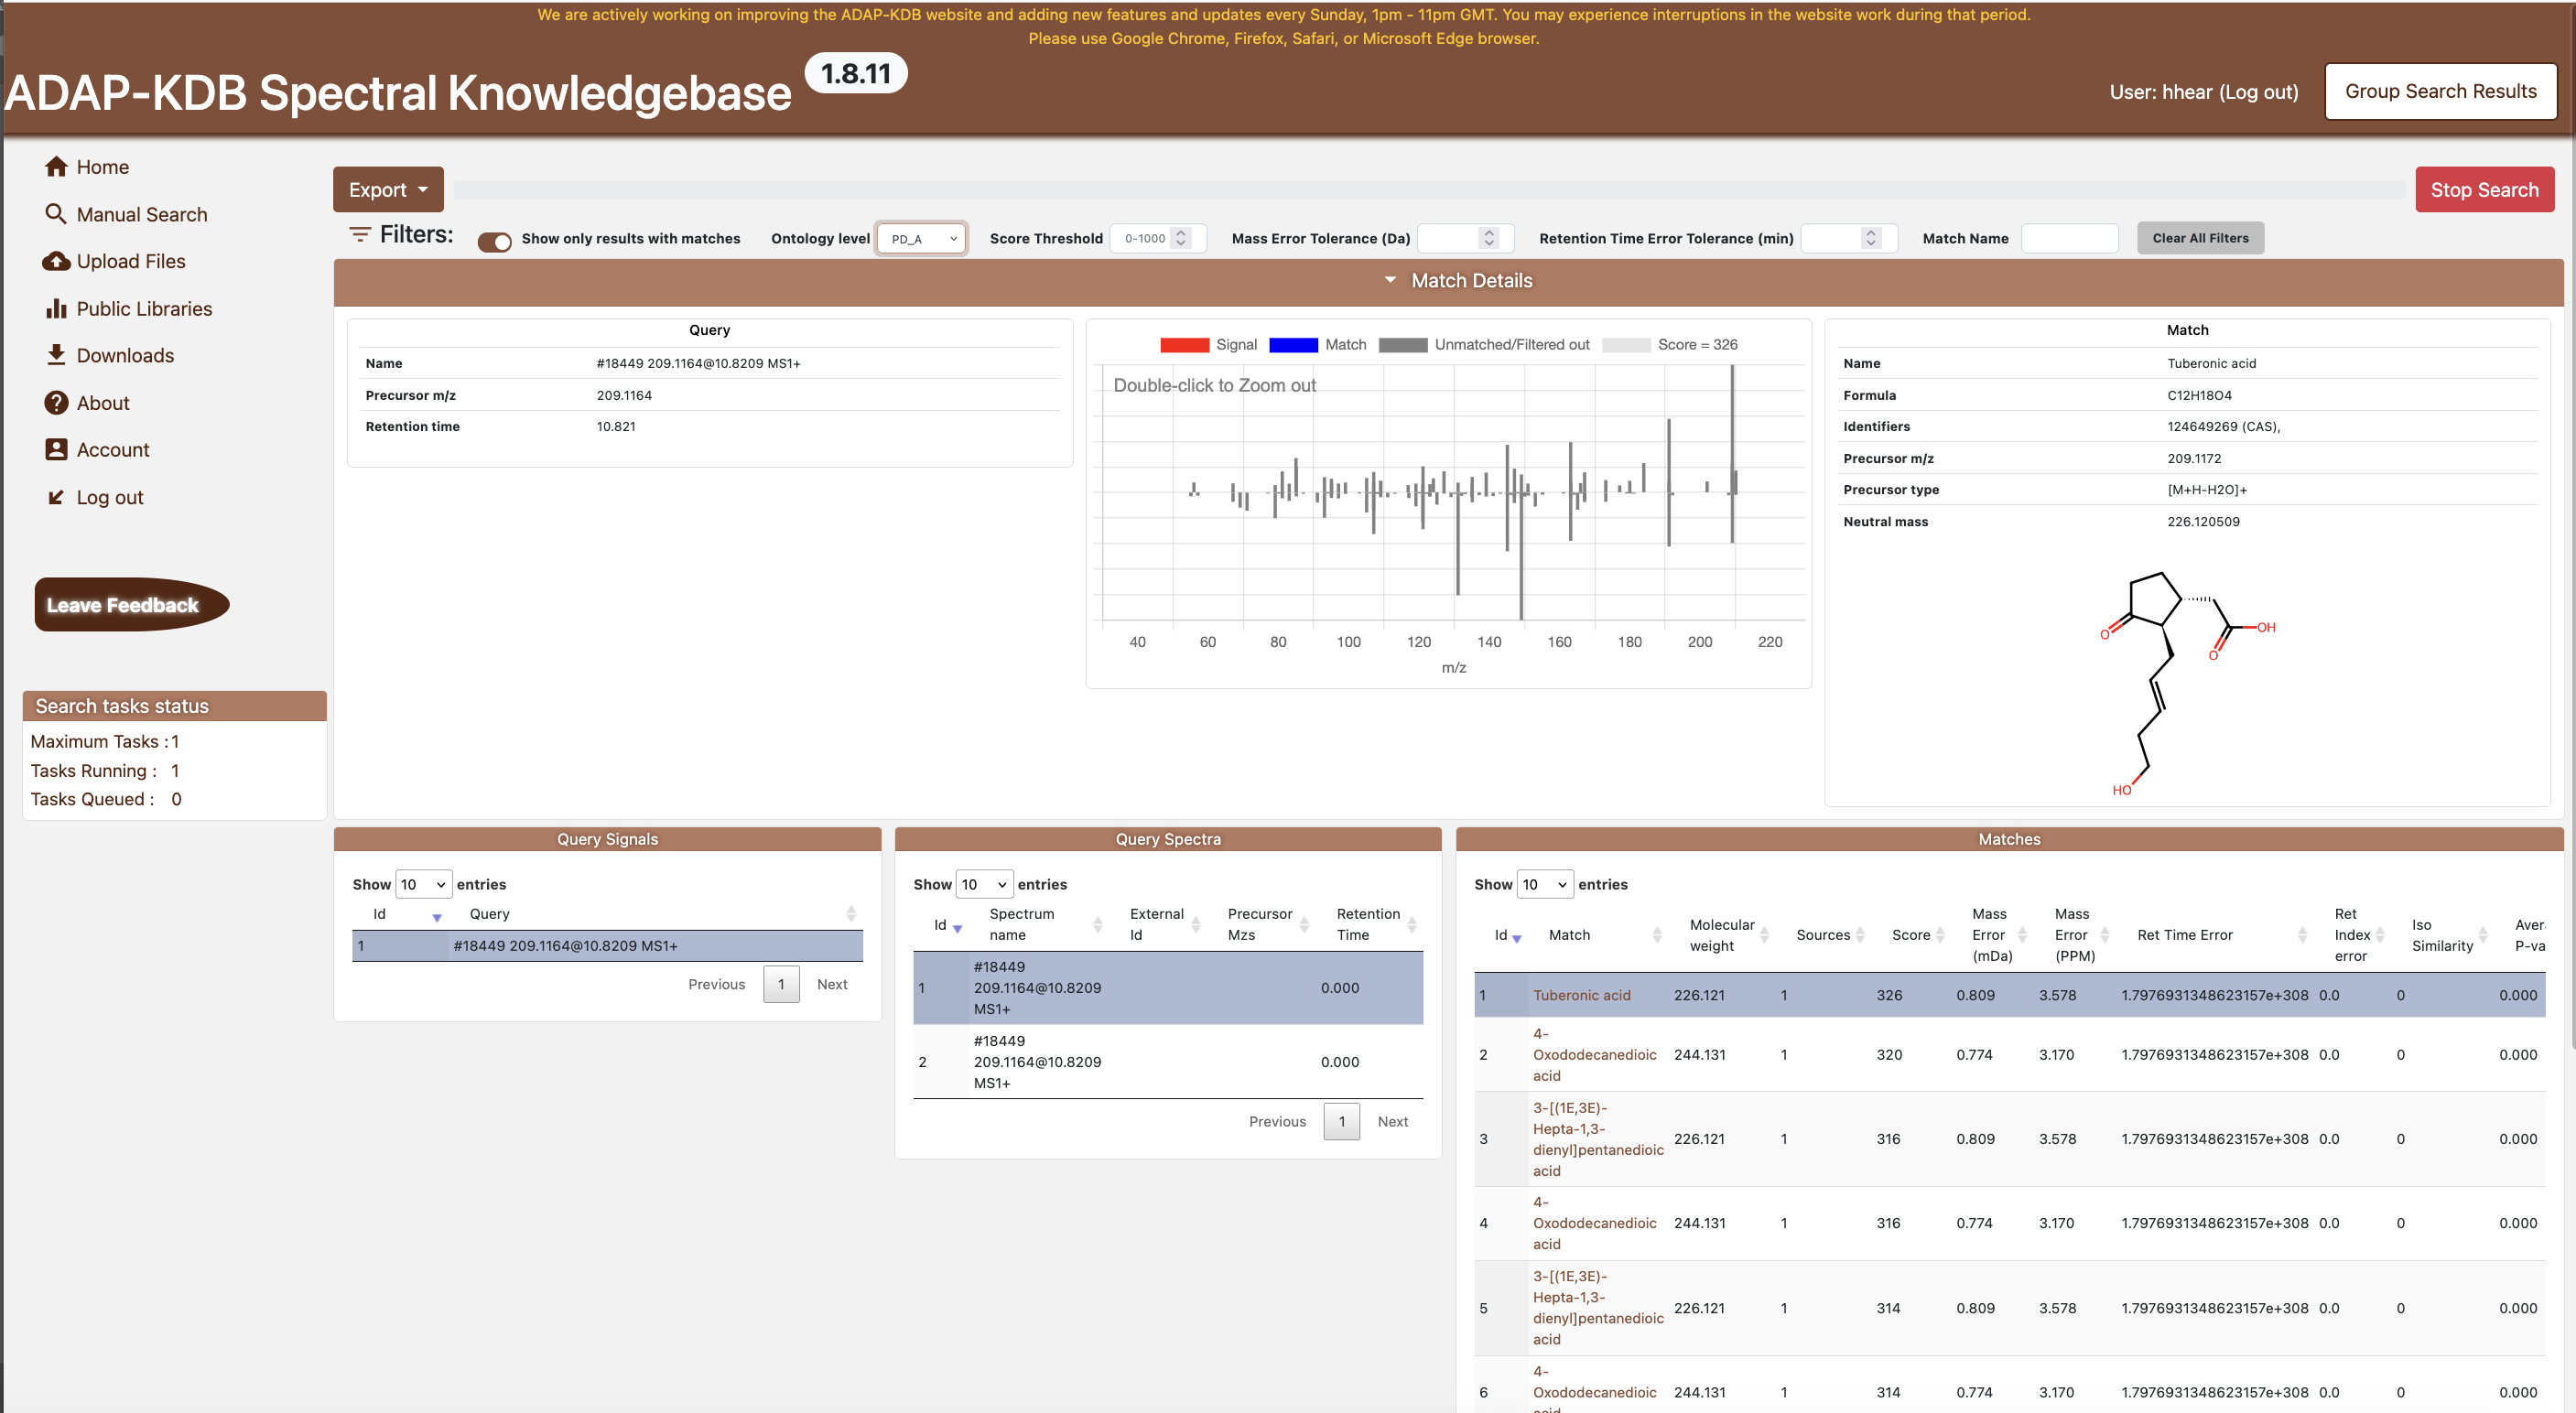 Figure 3.2: Group Search dashboard The Group Search dashboard
displays:
Figure 3.2: Group Search dashboard The Group Search dashboard
displays:
- Filters — options to toggle “matches only,” adjust ontology level, and set score, mass-error, and retention-error thresholds.
- Results table — a comprehensive list of matched compounds with query metadata, match metadata, similarity scores, errors, and ontology labels.
- Query pane — details of the currently selected query spectrum, including metadata and molecule structure.
- Match pane — metadata for the highlighted library match, including formula, precursor type, identifiers, and a molecular structure.
- MS/MS spectral match plot — compares the experimental MS/MS spectrum (red) with the reference library spectrum (blue), showing matched and unmatched ions across the m/z range. Greater alignment in peak positions and intensities indicates a higher similarity score.
- Distinct Query table — list of unique query spectra, enabling quick navigation through results.
Users can use the built-in DataTables search, filtering, and column sorting to quickly prioritise matches of interest.
3.6 Exporting Group Search Reports
Two CSV exports are available:
- Simple export — top-ranked match per query (ideal for quick reviews).
- Advanced export — all qualifying matches per query (comprehensive).
Chapter 4. Manual Search
Manual Search allows users to search without uploading files by manually entering spectrum data.
4.1 Running a Manual Search
To run a Manual Search:
- Navigate to Manual Search from the left sidebar.
- Select the Chromatography type tab (GC-MS, LC-MS, or LC-MS/MS).
- Fill in the query fields:
Identifier (optional): Compound name, CAS, HMDB, KEGG, PubChem ID, or InChIKey.
Neutral Mass (optional): Neutral mass of the compound in Da.
Precursor m/z (optional): Precursor m/z value for LC-MS/MS.
Spectrum: Paste m/z-intensity pairs. Accepts formats like:
79 100
67 90.33
80 75.87
Or space/tab/comma-separated:
79,100; 67,90.33; 80,75.87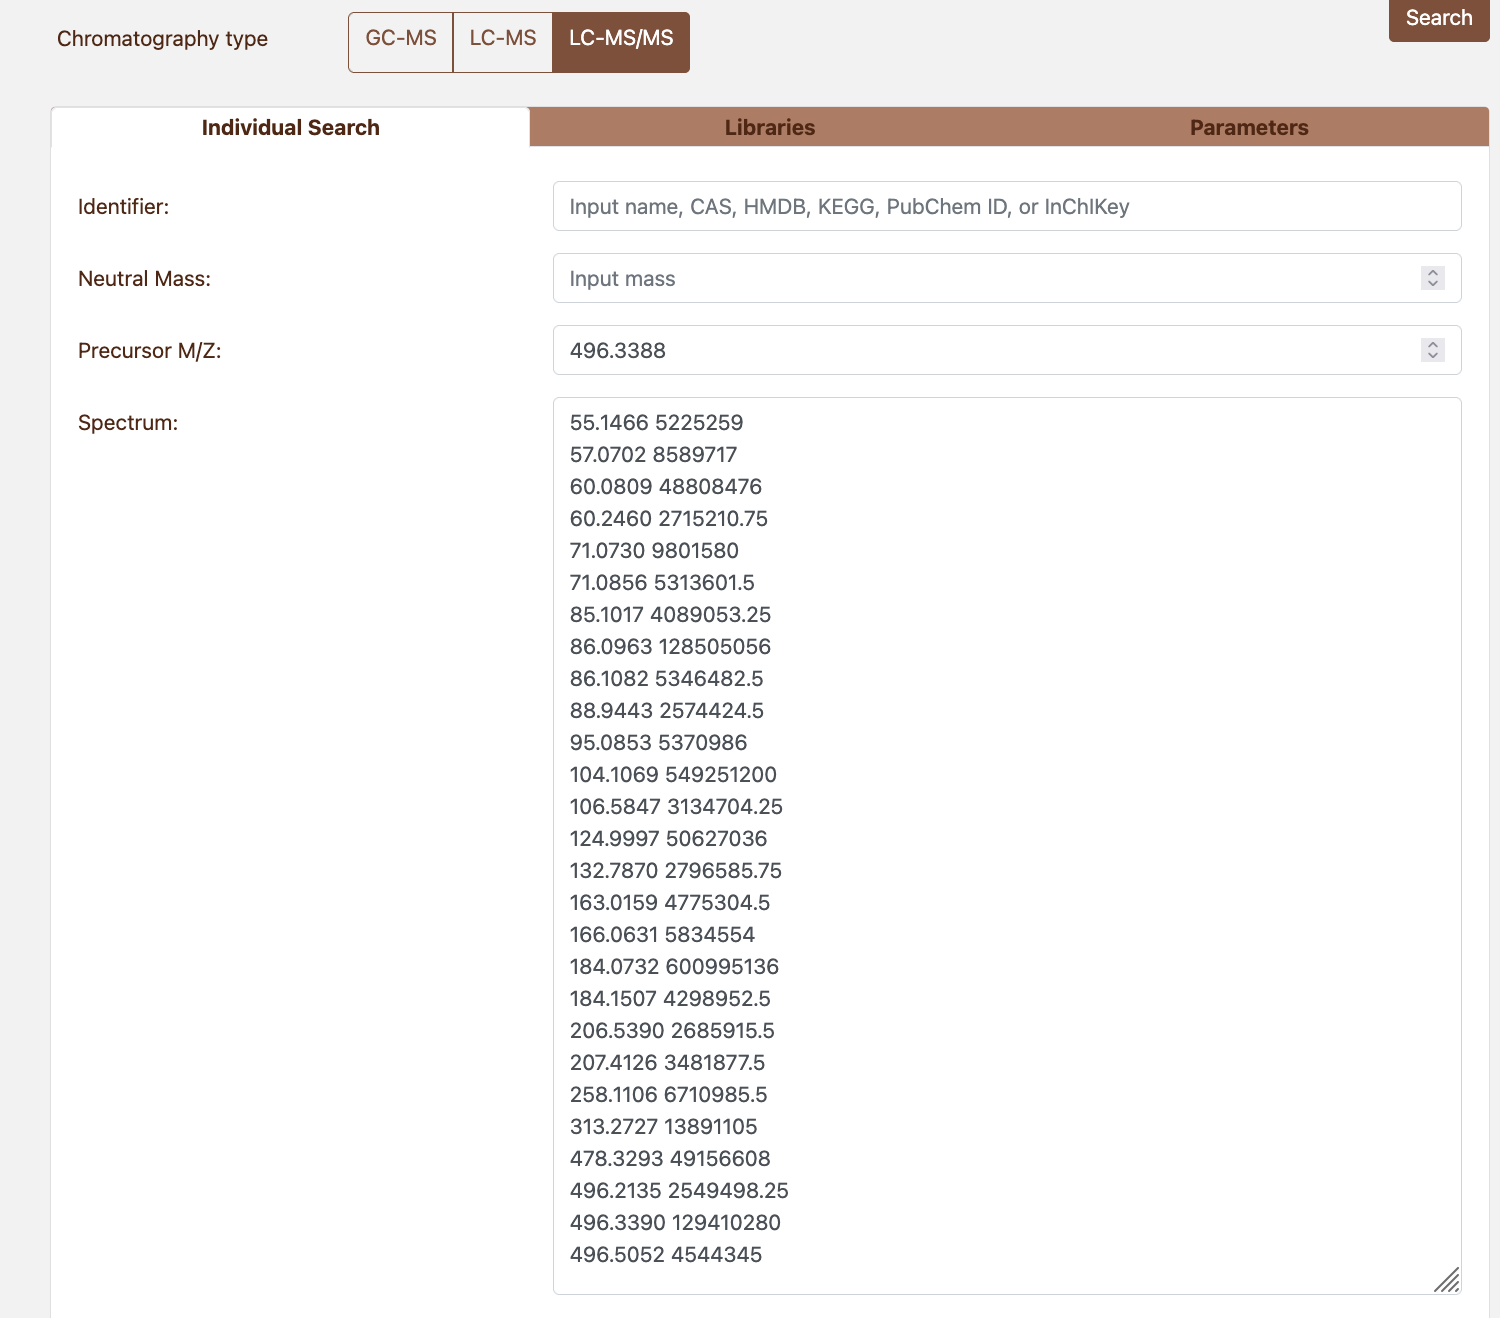 Figure 4.1: Manual search parameters
example
Figure 4.1: Manual search parameters
example
- Open the Libraries tab and select target libraries (at least one required).
- Open the Parameters tab and adjust:
- Score threshold (default 500; lower values return more matches)
- m/z tolerance (0.01 Da or 10-20 ppm typical for high-resolution)
- Retention index settings (GC-MS only)
- Matches per spectrum limit
- Click Search to run the query.
Note: If you leave Identifier blank, the search matches purely by spectral similarity. If you fill Identifier, results must also match that identifier.
4.2 Configuring Search Parameters
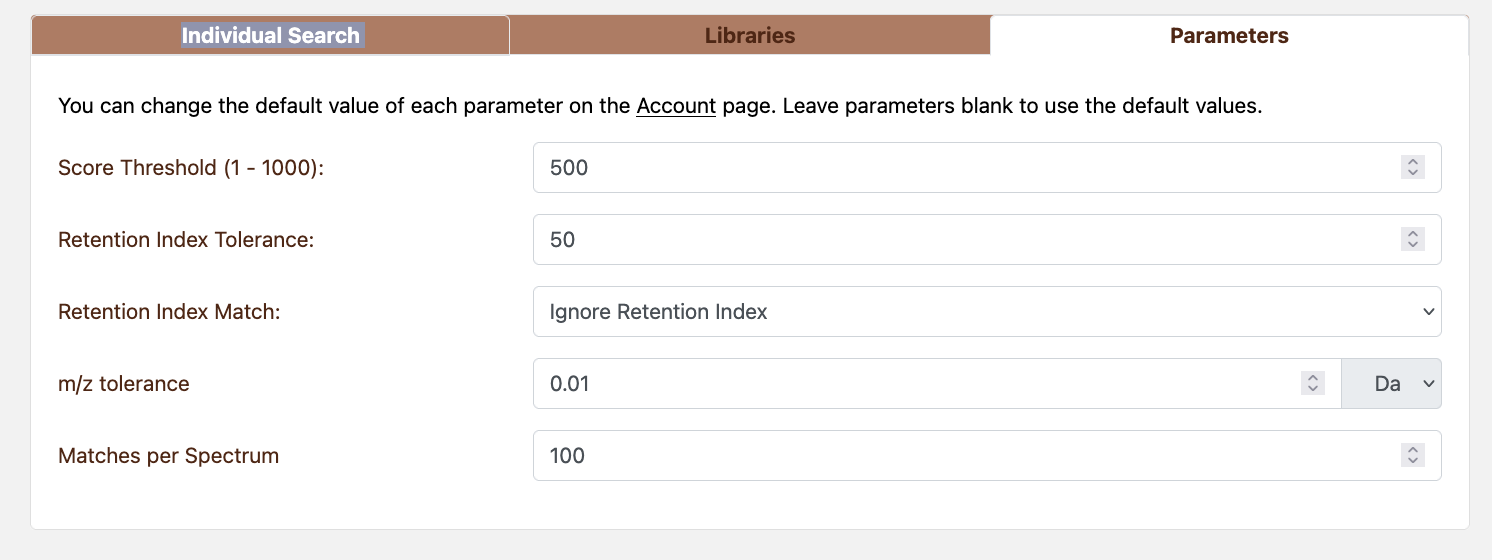 Figure 4.2: Manual Search parameters
Search parameters configurations:
- Score Threshold (
0–1000, default 500): filters matches by NIST score. Disable by leaving blank. - m/z tolerance (default 0.01): supports Da or ppm tolerances.
- Retention index tolerance (GC only) and retention index matching (exact, windowed, or ignored).
- Matches per Spectrum: maximum number of matches per query (default 100).
Settings persist in a cookie, allowing rapid reuse across sessions.
Chapter 5. Individual Search
Individual Search allows users to search a spectrum that was already uploaded or saved in a submission.
5.1 Running an Individual Search
To run an Individual Search:
Option A — From uploaded files (session):
- Upload files by clicking on the Upload Files button (see Chapter 6.2).
- Navigate to the submission review page.
- Click on a spectrum to view it.
- Click the Search button in the spectrum view.
Option B — From saved submission:
- Go to Account → Studies and open your submission.
- Click on a spectrum to view it.
- Click the Search button in the spectrum view.
The search automatically uses the query spectrum’s metadata (precursor m/z, retention time, etc.) and displays available filters in a modal.
Click Search to initiate the search; results load on the same page.
You can later change the libraries searched against by clicking on the Filter… button on the result page.
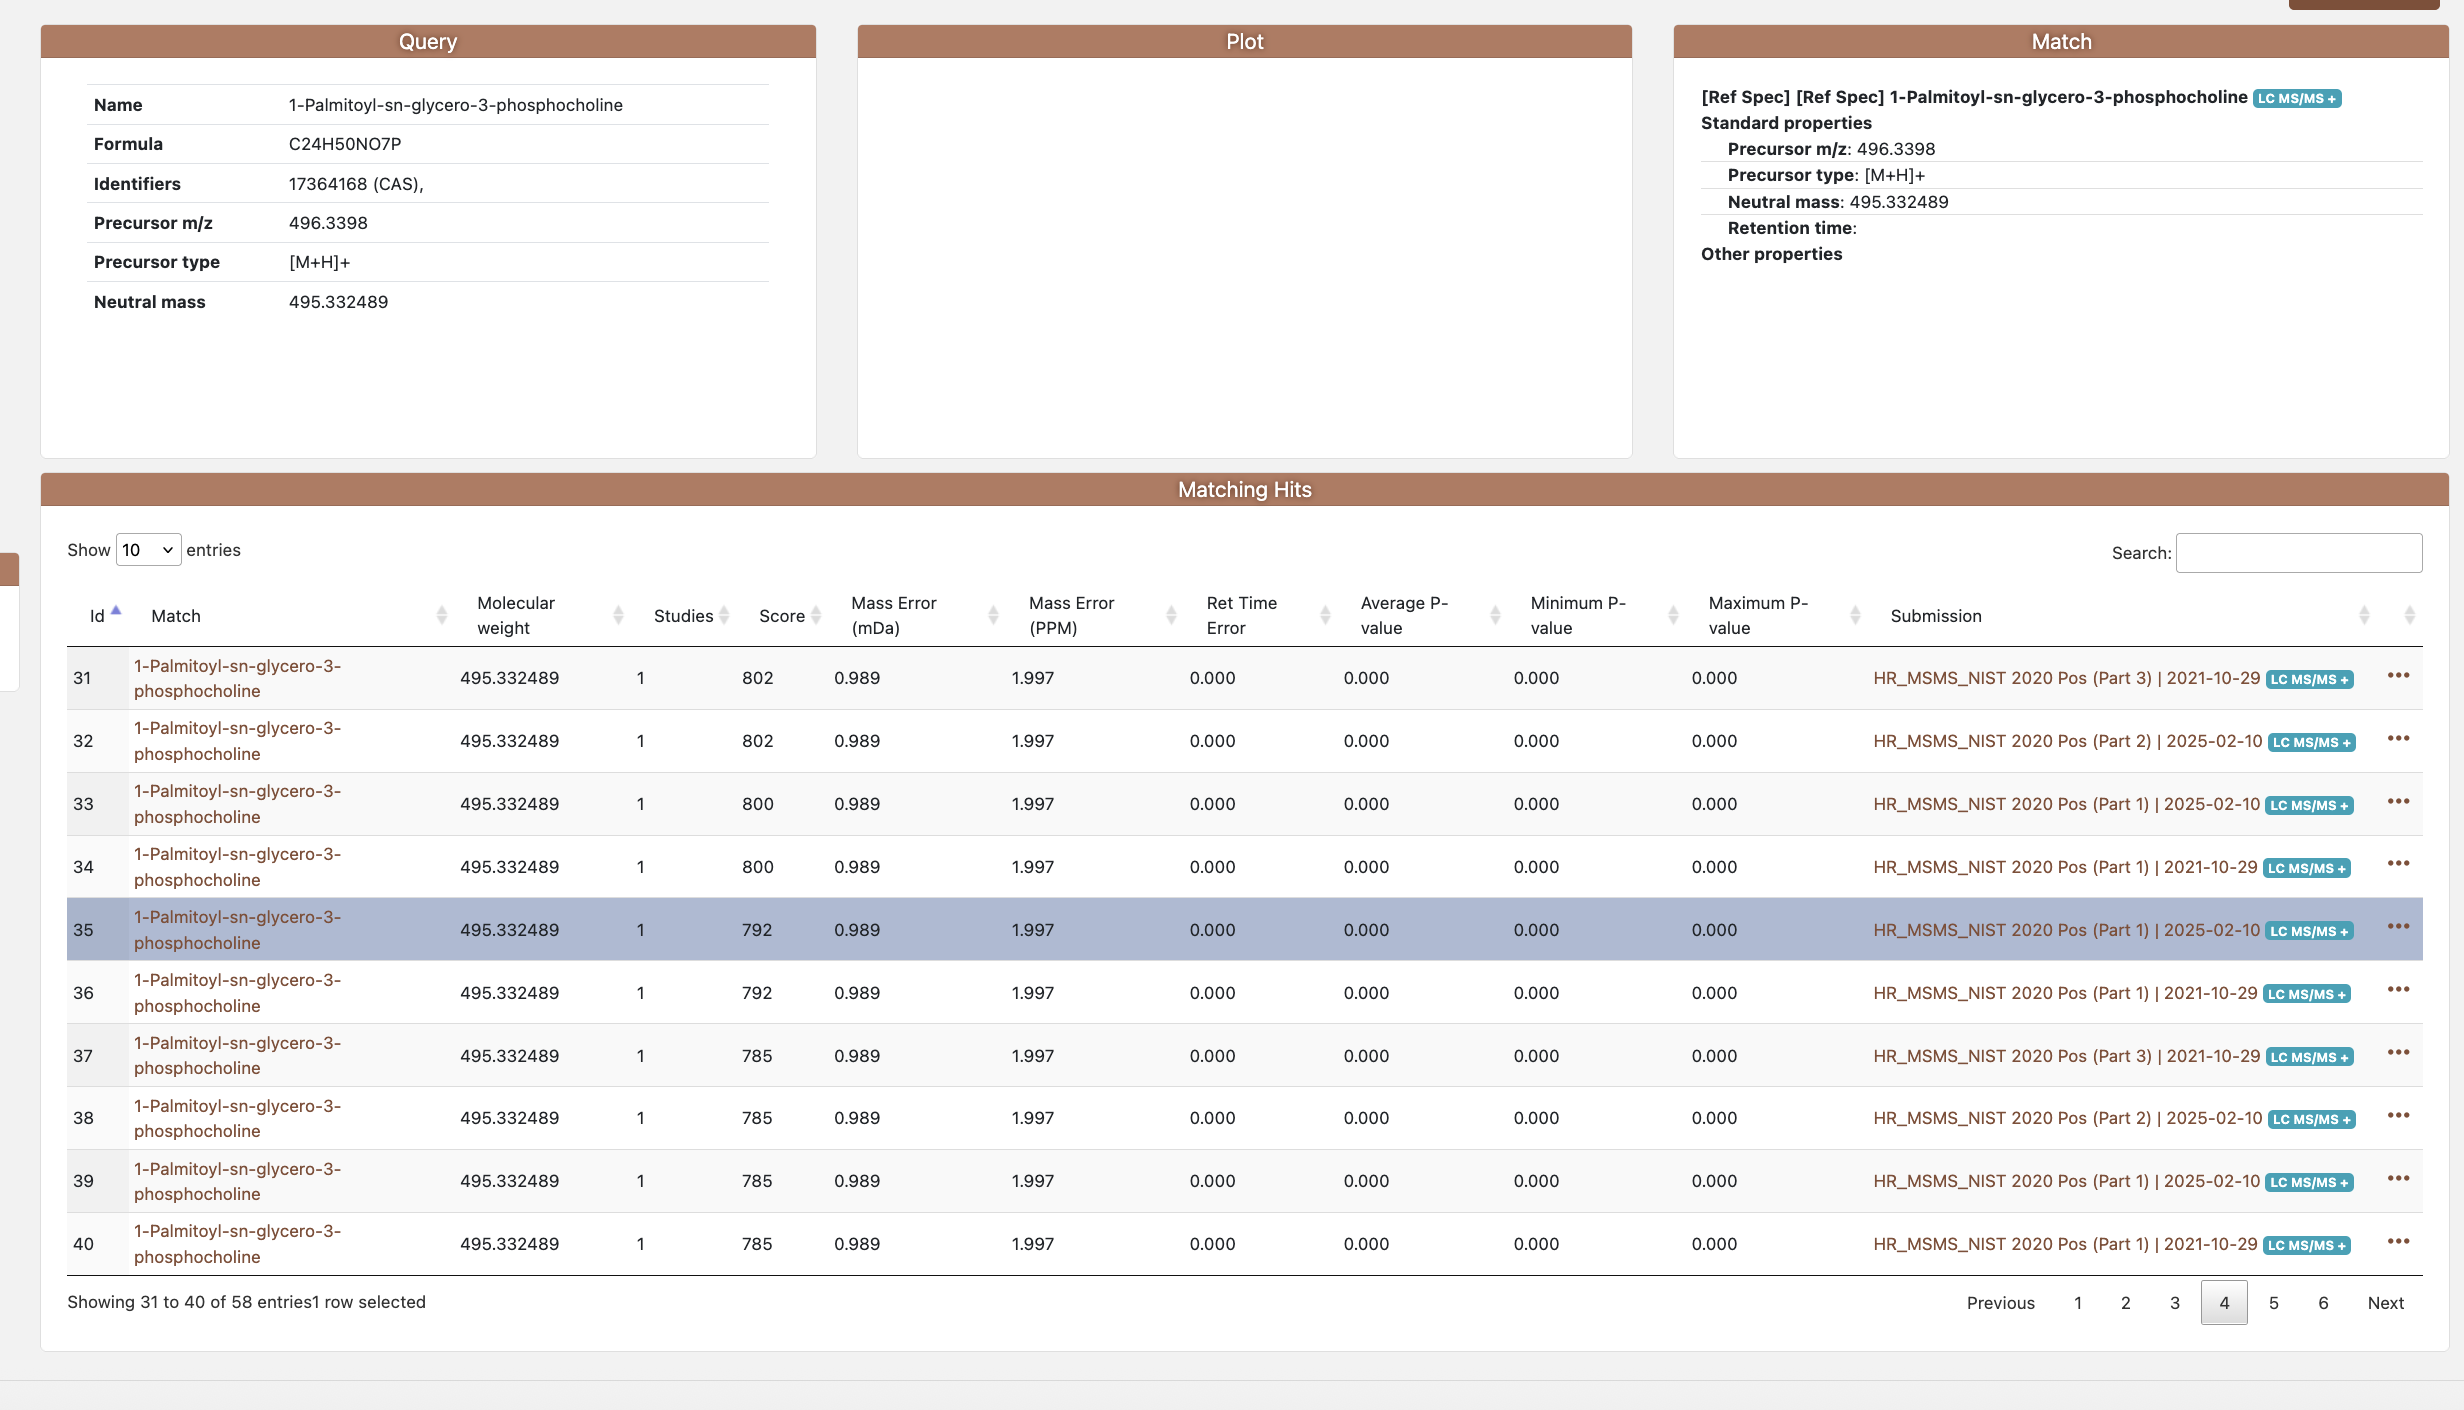 Figure 5.1: Individual Search result
page
Figure 5.1: Individual Search result
page
5.2 Interpreting Individual Search Results
The results table reports:
- # — rank order by score.
- Query Spectrum — name of the uploaded spectrum.
- Match — hyperlink to the matched spectrum (public or private).
- Neutral Mass, Library Size — metadata from the match.
- NIST Score — scaled 0–1.000 (displayed as 0–1000).
- Mass Error (mDa / ppm) — calculated from precursor values.
- Retention Time Error — minutes difference if retention data supplied.
- ANOVA p-values — average, minimum, and maximum significance (when available).
- Ontology Level — match confidence level badge.
Use table sorting and column filters (where available) to refine the view. Clicking the view icon opens the match spectrum page for deeper inspection.
5.3 Visualising Query vs. Match Spectra
The page embeds interactive components:
- Two-spectrum plot: overlays query and match peaks with zoom/pan controls.
- SpectrumInfo panels: summarise standard properties (precursor m/z, neutral mass, retention) and custom metadata gathered during upload.
- Structure rendering: when canonical SMILES or InChI is provided, the system generates 2D figures.
Hover over peaks to read m/z and intensity; use the toggle controls to swap between absolute and normalised intensity views.
5.4 Viewing and Saving Individual Matches
For single-spectrum investigations:
- View match details: Click on a match in the results table to view detailed information about that matched spectrum, including its properties and structure.
- Note: There is no export option for the search results table itself. To export multiple matches in CSV format, run a Group Search (Chapter 3) which provides CSV export options for batch reporting.
Chapter 6. Uploading and Managing User Spectra
6.1 Supported File Types and Chromatography Modes
File formats:
- MSP / MSL — canonical spectral format.
- MGF — tandem spectra.
- CSV — tabular annotations.
- RAW (
mzML,mzXML,CDF) — raw profiles converted into spectra.
Each upload is tied to a single chromatography type:
- GC-MS
- LC-MS (positive/negative pseudo spectra)
- LC-MS/MS (positive/negative)
- None (mass spectra without chromatography metadata)
6.2 File Upload
- Click on Upload Files on the side bar.
- Choose chromatography type (mandatory).
- Select one or more files. MSP files are more important and the default/recommended format for most users, as they contain both spectral data (peaks/m/z-intensity pairs) and metadata in a single file. Peaks are essential for library matching—the matching algorithm compares fragmentation spectra using cosine similarity, so signals without peaks cannot be matched. CSV files are supplementary and contain only metadata (no peaks). Mixing MSP with CSV files is an advanced option that allows you to supplement MSP metadata with additional information from CSV files, or to include signals that only have metadata (no fragmentation spectra) from CSV files—though these CSV-only signals will not produce matches.
- Optional: enable Round m/z values to standardise precision.
- Submit the form. For unauthenticated users, the system validates the reCAPTCHA response before reading files.
Uploaded data are stored in the HTTP session until saved or cleared.
6.3 Metadata Mapping
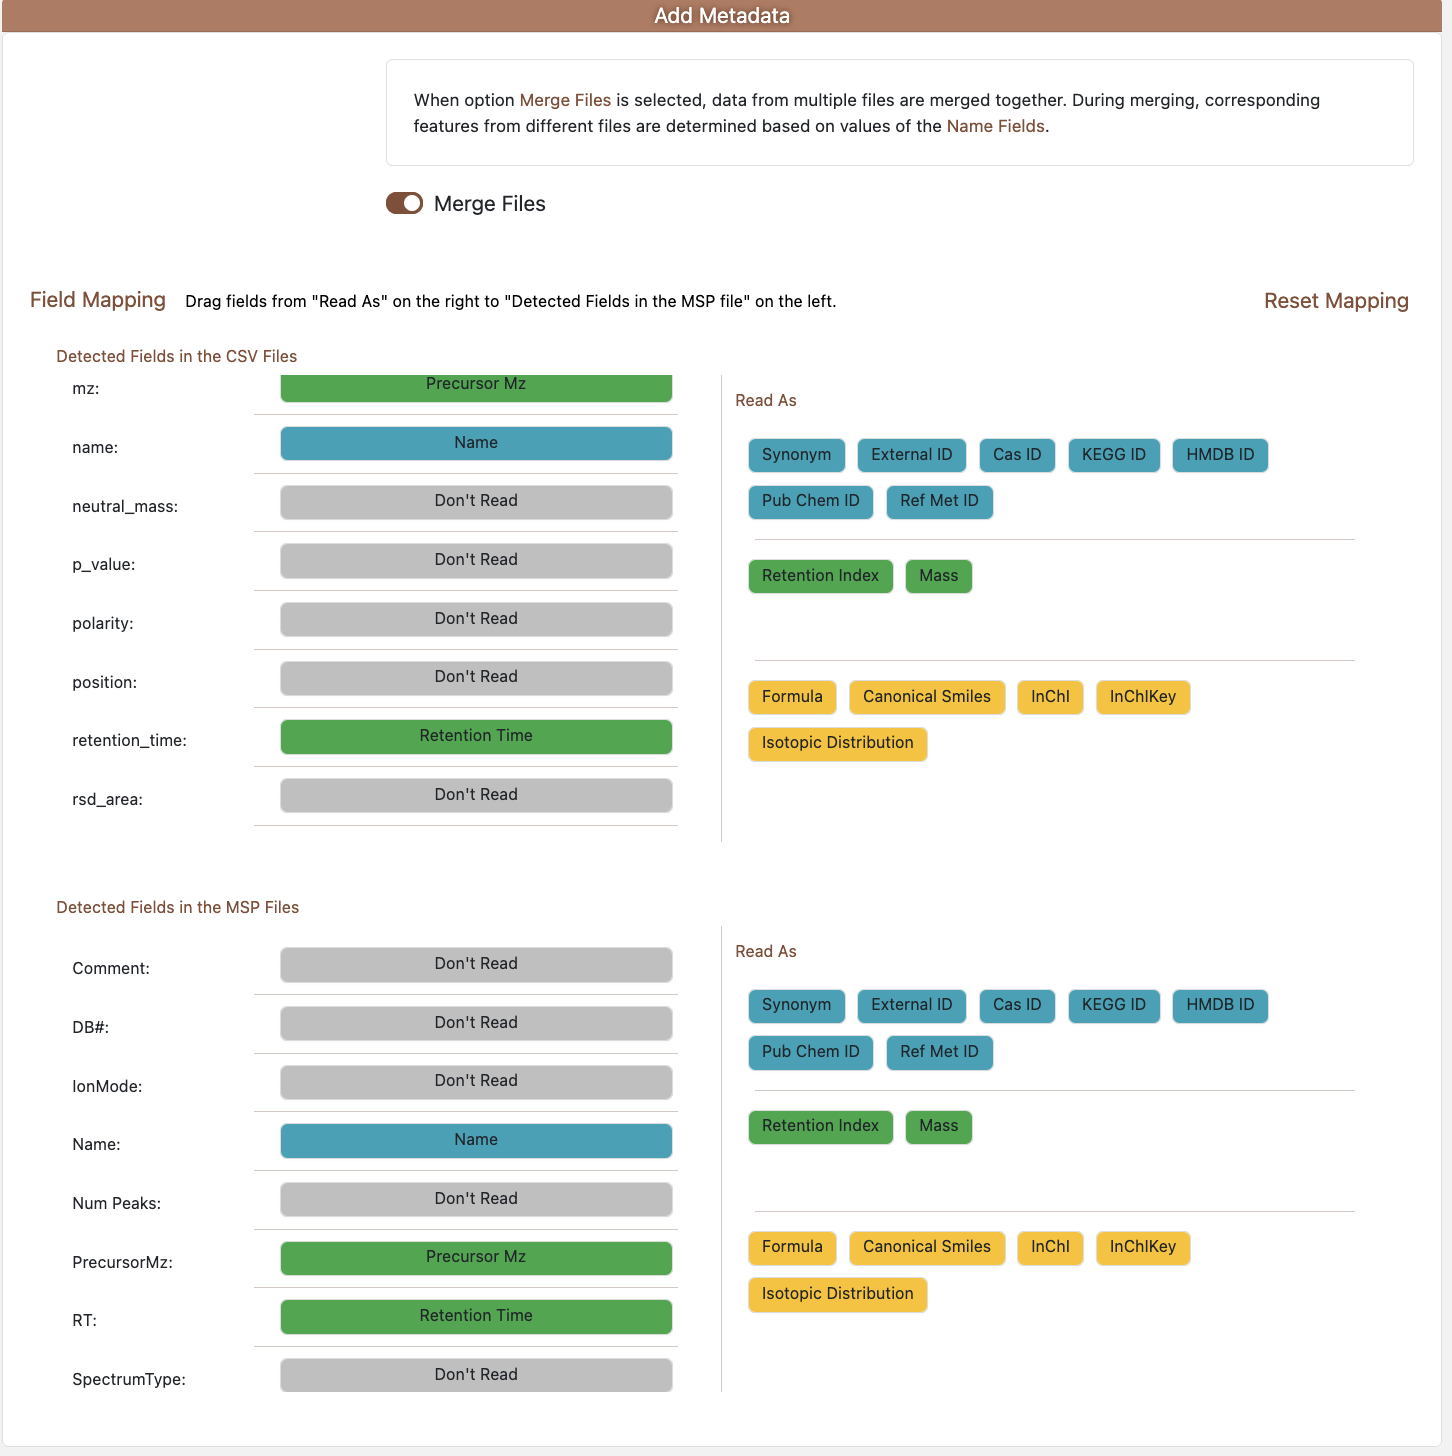 Figure 6.1: Metadata page
If uploaded files contain metadata columns, the system requests mapping:
- Auto-detected properties appear in a list per file type.
- The mapping interface displays:
- Left side: Available fields from your uploaded files
- Right side: ADAP-KDB metadata fields (Name, Synonym, External ID, CAS, KEGG, HMDB, PubChem, RefMet, Precursor m/z, Retention Time, Retention Index, Neutral Mass, Formula, Canonical SMILES, InChI, InChIKey, Isotopic Distribution)
- Drag and drop the metadata fields on the right to the fields on the left if applicable to read them in the files.
- Enable Merge files to combine multiple sources into
a single
Fileentity.
Field selections persist in cookies to streamline future uploads.
6.4 Submission Review and Editing
After metadata mapping, users are redirected to the submission review page where users can:
- Review uploaded files: See a list of all files with their types and the number of spectra detected in each file.
- Edit submission information:
- Name: Give your submission a descriptive name.
- Description: Add details about your study or dataset.
- External ID: Optional identifier from an external database.
- Reference URL: Link to a publication or related resource.
- Source: Text field describing the origin of the data.
- Tags: Add tags to categorize your submission (e.g., species, source, disease).
- Set visibility and library options:
- Private: Only users and administrators can see this submission. Private submissions are available for users to search against immediately after submission. If users are a member of an organization, private submissions are also shared with other organization members and will appear in their group search library selection page (marked with an “organization” badge).
- Public study: Uncheck “Private” to make the submission viewable via direct URL. However, public studies are not shown in the public libraries page and cannot be searched against in group search. They are only viewable if someone has the direct submission URL.
- Public library: Only administrators can mark a submission as a public library. Public libraries are visible to all users, appear in the public libraries page, and can be searched against in group search.
- In-house reference library: Mark this as an internal reference dataset (only available for private submissions).
- View and download files: Users can download the original files you uploaded (MSP, CSV, etc.) by clicking the download icon next to each file. This allows them to retrieve their own uploaded data, not the library/study files they searched against.
- Clear submission: Remove all uploaded files and start over (only available for unsaved submissions).
All changes are stored in the session until users click Submit. If required fields are missing, errors will be highlighted when users attempt to submit.
6.5 Viewing and Downloading Files
From the submission review page, users can:
- View file contents: Click the view icon next to any file to see its contents in a new browser tab. This displays the raw file content (e.g., MSP format) for verification.
- Download files: Click the download icon to save the original file to your computer with its original filename.
These options are available both for files in your current session (before submission) and for files in saved submissions.
End of manual.